Digi-Mom

The screensaver on our computer is a slideshow of photos I’ve taken over the years.  You would think as someone who scrapbooks that I’d have done more with those pics but no, they’ve stayed in digital form. Thankfully,  when I decided join in on the My Memories digital scrapbooking challenges, I had plenty of pictures to choose from.

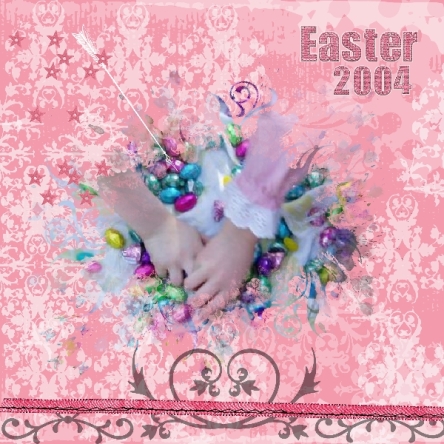
The picture used on this page is now sixteen years old! I only had given birth to one kid at that point but was featuring a very full belly as my second arrived a month later. In the shot is my eldest daughter’s hand and that of  her cousin, putting candies into a pile. We gather with my family for Easter brunch every year, except this one, and after eating the kids go play while the Easter Bunny hides chocolate treats. Then when all the goodies have been collected, the kids dump their findings into a big pile and watch eagerly as someone divides the sweets evenly between them.

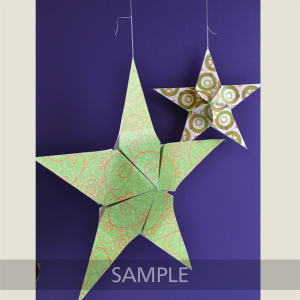
The one requirement of this challenge was to use the free digital papers and embellishments given away during March’s blog train. Every month, there is a colour palette selected and the various designers from My Memories create free items with those colours. Mid-month they post on their blog pages and you hop from blog to blog  collecting the goodies. I’ve already hopped on board April’s blog train and am eager to get started on the next challenge presented by Over The Fence Designs.

MMS Challenges-006

Another challenge I’m planning on joining each month is called Follow the Recipe presented by Connie Prince. Essentially there are required items that your scrapbook page must include.  February’s recipe was:
-3 or more papers
-2 hearts
-1 flair
-1 ribbon
-1 scallop or lace border

My version was closely based on the “inspiration” page Connie provided which consisted of only one photo and although I quite liked how mine turned out, I wanted to include all my babies.

IMAGES TEMPORARILY REMOVED AS PER AGREEMENT WITH CSM, WILL REPOST ONCE PUBLISHED IN SPRING 2021 ISSUE!!

Amazingly, I’ve completed eleven challenges this month, four in March and one in February.  One of  my favourite things about digital scrapping is that you can easily add or delete photos or elements and move them around without making a mess…there’s enough of that in my house as it is!

“A picture is worth a thousand words, but a scrapbook is worth a million memories.”

Remedios Lina C. Villarosa-Garcia

Crafts in the time of Covid-19*

Years ago I used to share my digital scrapbooking on this blog.  I’m at it again! Yes, some of the time on my tuchus in front of the computer has been spent creatively.  I still turn to MyMemories for great digital papers, quotes, and embellishments but lately, I’ve joined its forum to participate in various challenges.

I’m going to share a couple of my recent efforts and the My Memories freebies for those who scrap digitally. These two freebies are only valid until April 19th. If you are interested in starting to scrap digitally, I have a deal for you! My Memories has sent me an email that I’m allowed to forward to as many folks as I would like and in it is a link that will let you download their My Memories Suite 8 for FREE until April 30! The software is perfect for creating photobooks of past memories and scrapbook pages of what you are doing today (simply export to a JPEG and you can easily email your pages to those you want to share it with). Just leave me a comment if you want it and I’ll get in touch with you.

Ab Spring

Absolutely Spring: Click here or on image

Mother May

Mother May I: Click here or on image

I’m a total cheapskate so most of my digital downloads are ones I’ve managed to get for free. One great thing about some of these challenges is that they give you a freebie to use on your page or as a reward you for posting, sometimes it’s a mini kit from the online shop. There are also plenty of free items in the shop and most months there is a My Memories blog hop where you can get beautifully colour co-coordinated digital items from many designers – one should be starting today on the MM blog. So here are a couple of my pandemic creations. First is my Dr Bonnie page – love that woman! – the pandemic related words were given to be used with the Staying Home scrap challenge.

MMS Challenges-015

Next is about another one of my passions -reading.  The Keep Calm challenge freebie had many options to pick from: Keep calm &:  Stay Home, Shop Online, Work From Home, Be Kind, Home-School, Pray, Watch TV, or Give Thanks – all of these apply in my household but I picked one.  As you can see from my page I use GoodReads to track my reading – I even have a feed on this blog – because I read so much!

MMS Challenges-016

Anyhoo, more another day – maybe!

“Scrapbooking isn’t about scraps of paper and photos.  Scrapbooking is about scraps of life – yours and those special to you.” 

Rebecca Sower

*Apologies to Gabriel García Márquez for bastardizing Love in the Time of Cholera for my own giggle.

Raise a glass to Spring Break!

Living where I do, Spring Break is when the sun shines, the flowers start to bloom and the windows can be thrown wide open (for a very short time!). It’s also the time when I get to dig out some craft supplies from under the mound of debris that builds up in my craft area when school is in session.

As I mentioned last post, I indulged myself by purchasing the amazing Cricut Explore Air 2. This past week, once I finished load upon load of laundry,  I watched innumerable YouTube tutorials and decided to try my hand with the Cricut Holographic Sparkle vinyl in Fuchsia.  So pretty!!

DSC_0441_marked

My new camping wine cup!

DSC_0450 (2)_marked

DSC_0448 (2)_marked

Don’t you love how they look in different light?

My favourite thing about the wine cup is the lid. During one camping trip last year, I lost a glass of wine every single day due to my girls bumping into my side table — never again!!

But I went a little crazy last month when I discovered Facebook groups for those who adored their Cricut machines.  Looking at everyone’s posts inspired me to buy several of these stainless steel wine cups and several flasks in both white and pink! Now I just need to make them all extra beautiful. Thank goodness Spring Break lasts another week.


“Wine is the most healthful and most hygienic of beverages.”― Louis Pasteur


One Craft Addiction is Apparently Not Enough!

This summer I bought myself an amazing birthday present. Why? Because I’d been eyeing one for a few years and decided that I deserved to treat myself… a beautiful Cricut Explore Air 2.

Cricut

Isn’t she a beauty?


Anyhoo, I’ve been experimenting with paper cuts and vinyl too.  Loads of fun but it could easily become a serious and expensive addiction.

DSC_0433 (2)_marked

H's bottle_marked

H’s water bottle

H’s class all received identical water bottles and I’m completely grossed out by the thought of drinking from someone else’s glass or bottle and I DO NOT share cutlery – even with my kids.  So it’s a no-brainer that I’d have to clearly indicate which one is hers.  It was my first time doing a project with vinyl. Not too shabby!


DSC_0436 (2)_marked

I also tried my hand at Christmas ornaments…who (pun intended) doesn’t love this face?


Stable influence_marked

Hmm, what’s missing?

We decorated our classroom doors for Christmas and well, I left my NEEDS at home!  Yup, I did fix it but it left folks confused for a day as the world really is not a stable influence.


Still struggling a bit with this one as my FAITH won’t stick…yup, another funny! But seriously, I had to make a second vinyl Faith as the first one wouldn’t stay on the wood.


My current project. I just have to find the time to stick my words on and glue my pretty little flowers to the plaque.


“Creativity is Inventing, Growing, Taking Risks, Breaking Rules, Making Mistakes And Having Fun.”  – Mary Lou Cook

Yikes!

Just realized that I haven’t posted in almost a year! Clearly my time is going by very quickly. Can’t say that I’ve accomplished anything major in the past year or even created any cards/scrap pages worth posting. Guess I should clean my craft area and get back to it.

In the meantime, here are 3 freebies for you.

KS_SplashNSpring_QP1_PV1

PaintedWaterfalls

Preview

I hope you can make good use of them!

It takes a long time to bring the past up to the present.
FDR

Get a tree yet?

Do you kill your own tree for Christmas or buy it at the hardware store? Put up a plastic one complete with frosting and pine scent? Or simply use the biggest branch the last windstorm dropped in your backyard?

Pretty in pink?

Pretty in pink?

tree kill

You know you want to!

Whose house? I know!

Whose house? I know!

But hey, no matter how you celebrate, everyone loves a freebie!  So here’s another time limited seasonal decor item thanks to mymemories.com.  Get it before Christmas Eve.

 http://www.mymemories.com/store/share_the_memories_kit_1

Tree 1

http://www.mymemories.com/store/share_the_memories_kit_2

Tree 2

http://www.mymemories.com/store/share_the_memories_kit_3

Tree 3

And here’s what you do with them…

3D Tree Tutorial
1. Print your file on cardstock. To create a 3 layered tree, you will need one base, one middle piece, and one top. Gather necessary supplies. (Recommended supplies: ruler, scissors, glue, bone folder with pointed tip) Be sure to set your margins as close to 0 as possible.
2. Using the bone folder score from the top tip down to each of the 3 corners. There should be 3 fold lines from the tip on each piece. Also, score the bottom triangle of the base.
tree folds
3. Cut out all of your tree pieces.
tree bits
4. Fold on the fold lines. Folds should all be folded in towards the white side of the paper.
tree folded bits
5. For top and middle pieces, place glue on the flap and glue together to form a pyramid.
6. For the base piece, apply glue to both flaps.
7. Bring small triangle base up and glue in place.
tree pyramid
8. Attach the side tab to the inside flap to form a pyramid.
9. Stack tree pieces, as desired. These trees can be made using 1, 2, or 3 layers per tree.
I’d love to see what ones folks actually make as I personally don’t have the time this Christmas…maybe next year?
Gee, do they still make wooden Christmas trees?
-Linus

Last minute decor freebie!

Looking for a quick decoration for Christmas?  Here you go:

http://www.mymemories.com/store/share_the_memories_kit_1

Star 1

http://www.mymemories.com/store/share_the_memories_kit_2

Star 2


http://www.mymemories.com/store/share_the_memories_kit_3

Star 3


These are free downloads but the stars are only available ’til the 10th so get them NOW!  These 3D Stars are great to hang as decorations on stairs or shrink them down and use them to decorate your Christmas Tree.

The key to these stars is to make sure that you have a total of 10 cone shapes to put these together. You can mix and match the patterns, but you need 10 of the same size to get a finished 3D star.


“I love the stars.
Because they can’t say anything.
I love the stars.
Because they do not judge anyone.”
―    Natsuki Takaya

Cool cupcake wrappers

Here’s a great freebie for those of you who like to pretty up your summer treats.  If you have the right software, you can even make your own personal touches.  If you don’t have any software that will work for these, you can download them just as zip files.

If you are looking for a cheap ($39.97 US) but good scrapbooking, card-making software that you can use these with I can give you a code to get $1o off the software, My Memories.  If you use this code to purchase the software, you will also get a code worth $10 to spend at mymemories.com so you can get some cool digital downloads to work with. (You can find the code in the right hand column of my blog.)

http://www.mymemories.com/store/share_the_memories_kit_1  Click here to get the July 4th topper.

http://www.mymemories.com/store/share_the_memories_kit_2   look like these:

The last one is quite elegant.

This can be found at: http://www.mymemories.com/store/share_the_memories_kit_3

Using MyMemories Software to Customize your Cupcake Liners

  1. Download template file and install it into your software
  2. Using MyMemories Suite, choose Create Album From Designer Template and find your project
  3. Now you can print and enjoy the provided template, or customize it with your own papers and embellishments.

TIP: You can right-click on the white guide and lock it in place to keep it from moving while you are working. Make sure this is the top layer of your project before printing. Instead of adding the paper as a background paper, you can add it as an embellishment so that you can move the paper around.  This is especially useful when using papers with stripes or circles, so you can decide which part of the paper you want to use. Once it is added as an embellishment, you can now select the paper and move it into the position you want it.  Just SAVE and PRINT on cardstock!

Cupcake Liner Tutorial

1.  Purchase or bake and cool cupcakes.  If cupcakes are frosted, place in refrigerator and chill cupcakes before putting liners on.  It is easier to put liners on if the frosting is cold. 2.  Print your cupcake liner templates on cardstock and gather supplies.  Each printed page will have enough supplies for 2 cupcakes. (Recommended supplies: small craft scissors, tape, foam squares, 1.25″ circle punch, toothpicks and ribbon)
3.  Using the scissors cut along outside line. TIP: Use a 1.25″ circle punch to cut out the toppers.  If printed at full size, the circles should be exactly the same size.

Cut out Pieces

4.  Wrap liner around cupcake and tape at seam. TIP: If using a smaller cupcake, just wrap around at the desired height. You can place a smaller cupcake at the bottom of the liner or make it tighter and wrap it around at the top.

Wrap liner around cupcake
5.  Using foam squares or tape, attach the front and back circles together to form the topper. Insert toothpick between the circles.

Topper instructions

Cupcake topper
6. Add ribbon onto the toothpick or at the bottom of the front circle, if desired.

Add Ribbon

7.  Insert toothpick into cupcake.  Enjoy the finished cupcakes and share.  Don’t forget to use your imagination.

Finished cupcakes

If you do decide to purchase the software, the code to use is: STMMMS89083

“When you look at a cupcake, you’ve got to smile.”

~ Anne Byrn

Get some balls this Christmas!

Got your attention didn’t I?

Anywho, I’m posting after a huge break from writing to help promote something near and dear to my heart.  My eldest sister and her husband make gorgeous blown glass Christmas ornaments.  They sell for $20 each and ALL proceeds go to support The Ride to Conquer Cancer.


Like my mom, my sister is a cancer survivor and her husband did the ride in her honour for the past two years.  Even better, she rode it last year.  When she received the word that she was cancer free, she signed up.  The training was brutal for someone fresh out of chemo but she endured.  We are all so proud of her effort and thrilled that she made it across the finishing line under her own steam!  And speaking of steam, here’s a look at what her hot air (and a lot of other heat) can produce!


I’m posting this on my blog as it also links into Facebook.  For friends and co-workers, I have a supply of these at my desk that I can carefully wrap in tissue paper, put into a hand stamped (by my big sis) box and drop off or send out to you.  They are truly great gifts and each one is unique.


Here’s a look at the artists as they work.


Cancer is a word, not a sentence.

– John Diamond

Thank you gifts

The school year ended a couple of weeks ago and I did get my butt in gear and make cards and gifts for the classroom teachers and learning assistants who help my kids out.  Everyone got a variation of the teabag holder that I showed in an earlier post, Tea Time.   The cards were inspired by something I saw in the Sale-A-Bration brochure in the spring but I mucked about and made them all my own.

More another time – the kids need milk!  Like what you see?  Let me know!

The best teachers teach from the heart, not from the book.

~Author Unknown